Kale and Pear Salad

I am BEYOND excited to come home and see my family on Saturday. It’s the first time I’ve gone three semesters in a row without a summer break. I had five classes and an internship this term and thought it would be easy, but alas, I was quite incorrect. I definitely learned a lot, but am ready for vacation — A.K.A. spending time with family at the cottage and cooking 24/7.

I have fallen in love with kale this semester. Not only is it cray cray healthy for you (one cup has loads of calcium, vitamin A, vitamin C and vitamin K), it also is always on sale for 99¢ at my local grocery store! I’ve been throwing it into everything from smoothies to salads.

Salad 1

Naturally, my mom was the one who introduced me to kale. Her friend would always throw it into anything and swore by it! I haven’t been around to enjoy my mom’s cooking for a while, but if you asked my dad, I’d bet he’d tell you they’ve had it in one of their dinners this past week.

When I first tried kale I hated it. I thought it was bitter and chewy and straight up gross. When combined with the right vegetables (or fruits) it turns into something WAY better. So — if you are on the “I hate kale” train, then please give it a chance. If you still hate it after you try this recipe then I will apologize.

You’ll need:

  • 1 or 2 pears, cut into small chunks
  • 1/4 cup pine nuts
  • 1/4 cup dried cranberries
  • 1 bunch of kale, de-stemmed and roughly torn into pieces
  • 1 tablespoon fresh lemon juice
  • 2 tablespoons extra virgin olive oil

Salad 2

Begin by toasting the pine nuts. Put them in a skillet on medium heat and swirl them around for a few minutes until they turn golden brown. Set them to the side.

After you have washed, de-stemmed and roughly torn up your kale, give it a little massage. Yes, I said massage. Take bunches of kale in both hands and rub them together. After a minute or two you’ll notice that leaves will darken, shrink in size and become silky in texture. In the end, the kale will be transform from bitter and tough to silky and sweet.

Chop the pear into chunks and throw it in a bowl along with the kale, pine nuts and dried cranberries. Add the lemon juice and olive oil, toss and you’re ready to go!

yourstrulyg


Posted in Food | Tagged , , , , , , , , , | 1 Comment

Moroccan Couscous & Charred Chicken

I’m back again with another recipe that was made at our cottage during my break. This is one of the most colourful dinners I have ever made. The pistachios, couscous, pomegranate and cilantro add amazing hits of color. It’s a work of art AND it tastes good!

Couscous_1See? Wasn’t I right?

Since I made this recipe at our cottage, I’ve been dying to make it again. Sadly, I haven’t had enough hours in the day to do it. Since being back at school, the work never ends — but that’s okay! I’m doing something I love, so that makes it much easier. I have a goal: hopefully by next weekend I will be able to have an afternoon where I can relax, go to the grocery store, and then come back to the dorm kitchen to cook this yummy couscous.

Where did this recipe come from? Because I am a huge foodie nerd, I follow a bunch of YouTube food channels. One of my favourites is Sorted Food. They had a series going for a while called EyeCandySorted, where every week they would release a beautifully shot recipe montage. This one caught my eye immediately and has been sitting in one of my Pinterest folders ever since. I seriously thought I couldn’t make my plate look as pretty as their’s in the video, but I think I managed. What do you think?

Here’s a link to their video if you want to watch before reading the recipe here.

You’ll need:

  • 1 tsp cumin seeds
  • 1 tsp coriander seeds
  • 1 tsp mixed pepper corns
  • 1 tsp salt
  • 2 tbs rapeseed oil
  • 150g couscous
  • Pinch of saffron strands
  • 200ml chicken stock
  • 2 chicken breasts
  • 1 heaped tbs harrissa paste
  • Glug of olive oil
  • 1 lemon
  • 1 red onion
  • 1 pomegranate
  • Handful of pistachio nuts
  • Handful of fresh coriander
  • Dollop of natural yogurt
  • Pinch of paprika

This recipe serves 2

Place the spices and salt into a pestle and mortar, then grind until powdered. Grind in the rapeseed oil. Pour the mixture into the couscous in a heatproof bowl.

Boil the chicken stock along with the saffron strands and pour over the couscous to cook.  Sit the bowl in warm place and leave for 5 minutes to cook.

Trim the skin and any sinew from the chicken breasts, then butterfly to thin them out and increase their surface area. Bash them out between two sheets of greaseproof paper.

Rub the harissa paste into the chicken flesh with a glug of oil and the zest of the lemon.

Preheat a cast iron griddle pan, then grill the chicken for a few minutes on each side until charred and well and cooked through.

Halve the pomegranate and bash the seeds out by hitting the back with a wooden spoon over a bowl of cold water. Scoop any scraps that are floating on top of the water and drain the pomegranate into a sieve.

Peel and finely slice the red onion.

Squeeze the lemon juice into the couscous.

Toss the onion slices, pomegranate seeds and pistachio nuts into the couscous along with plenty of coriander leaves. Strip the cooked, charred, chicken into pieces and scatter onto the bed of dressed couscous. Dribble with the yoghurt and garnish with a pinch of paprika.

There are a lot of ingredients and it does take a bit of time, but as always, totally worth it.

yourstrulyg


Posted in Food | Tagged , , , , , , , , , | 1 Comment

Rooibos Tea Ice Cream

Our family swears by Rooibos tea. The caffeine free tea has too many health benefits to count! When combined with loads of sugar and cream, these advantages are essentially lost — but that’s the point of ice cream anyway, right?!

Icecream_1Coming home from school for a week means that I basically do two things: cook and sleep. I’ve been having the best time! I love my amazing school and Arizona (where it is currently 12 degrees warmer), but there’s something about home 😉

I found this recipe on Drizzle & Dip, written by Samantha Linsell. Her website is wonderful and has the most beautiful photography. She even has her own book that I am extremely tempted to buy. Sam explains that this Rooibos tea ice cream is based on a Ben & Jerry’s vanilla recipe and doesn’t involve using a cooked egg custard. She says to look into using this recipe and infuse the tea if you have an issue with using raw egg.

The recipe calls for 4 tablespoons of Rooibos tea leaves. I was skeptical that this wasn’t enough at first, but was pretty happy with the results. I would have let the milk infuse for 7-10 minutes for a stronger flavour. Another great thing about Rooibos is that the longer you steep it, the more flavorful it will become (and it doesn’t become bitter). 

Icecream_2

Don’t have an ice cream machine? Check out this post by Scoop Adventures!

You’ll need:

  • 1¼ cup milk
  • 4T Rooibos loose tea leaves
  • 2 eggs (free range)
  • ½ cup sugar (125ml)
  • ¼ cup honey (60ml)
  • 2 cups cream, heavy or whipping

Bring the milk to just boiling point and then turn off the heat. Add the tea leaves to the milk and allow to infuse for about 3-4 minutes. Strain and set aside to cool.

Beat the eggs and sugar until fluffy, about 2 minutes. Add the honey and continue to beat for another minute.

Measure out one cup of cooled milky tea (if you have less than a cup, top up with extra milk, if you have too much, discard) and add this, with the cream to the egg base and briefly mix.

Run the mixture through an ice cream maker until ready according to the manufacturer’s instruction.

Pretty simple, eh?

yourstrulyg


Posted in Food | Tagged , , , , , , , | 1 Comment

Chocolate Macarons

Okay…I might have said last Sunday that I was going to post a new recipe using chia seeds today…but chocolate macarons are so much better, right?!

This photo was taken, believe it or not, two summers ago! I don’t know why or how, but the recipe never made it to the blog that summer. I think it may have been lost among the copious number of food pictures in iPhoto. I apologize for the lateness but hey – at least you get the recipe now! Here they are: the chocolate sandwiches of wicked awesomeness.

Processed with Rookie

I remember the day Gracie and I made these. We had scheduled a “Cousin Day” filled with baking and chatting. I’m pretty messy in the kitchen on my own. With Gracie the mess DOUBLED! Somehow there was flour and splatters of batter everywhere you looked. I think chocolate ganache was flung on my nose at some point! We’re pretty crazy when we’re together, that’s for sure. I love it.

Looking back, I actually have no clue how we managed to make these. They’re one of the most difficult recipes I’ve ever tried. It takes a lot of practice, so take that into consideration! Don’t worry if you mess up on your first try. It’s a crazy long process of sifting, whipping egg whites and piping. Even though it takes a while, it’s worth it. These are so good. Good luck!

For the macarons you’ll need:

  • 2 cups powdered sugar
  • 1 cup almond flour or almond meal
  • 3 tablespoons natural unsweetened cocoa powder
  • 1/4 teaspoon fine salt
  • 3 large egg whites, at room temperature
  • Pinch cream of tartar
  • 3 tablespoons granulated sugar

For the ganache you’ll need:

  • 4 ounces bittersweet chocolate, finely chopped
  • 1/2 cup heavy cream
  • 2 tablespoons unsalted butter (1/4 stick), at room temperature and cut into cubes

Begin by lining two baking sheets with parchment paper; set aside. Fit a large pastry bag with a 1/2 inch tip; set aside. Don’t have a pastry bag? Take a large Ziploc bag and snip off the tip with a pair of scissors.

In a large bowl, sift the powdered sugar, almond flour, cocoa powder, and salt together. Mix well and set aside.

Now you need to make a meringue. Place your egg whites in a clean bowl and get your beaters ready. You can also use your stand mixer with the whisk attachment for this part. Beat the egg whites on a medium speed until opaque and foamy (30 seconds). Add the cream of tartar and then increase the speed to medium high. Beat the egg whites until they are white in color and hold the line of the whisk (1 minute). Continue to beat, slowly adding the granulated sugar, until the sugar is combined, the peaks are stiff, and the whites are shiny (about 1 minute more). Transfer the meringue to a large bowl.

Use a rubber spatula to gently fold the dry mixture into the egg whites. Do this in four batches until the dry ingredients are just combined. Be careful during this part. Too much pressure and/or adding too much of the dry ingredients at a time will deflate the meringue. When you are done the mixture should look like cake batter.

Transfer the batter into your pastry bag. Pipe out 1-1/4 inch circles about 1 inch apart onto the baking sheets. Pick up the baking sheets and bang them against the work surface. This helps create the macaron base or what is referred to as a “foot” (if you want to be all fancy). Let them sit at room temperature for 30 minutes. This drys them out to ensure even cooking.

Heat the oven to 350°F and place one baking sheet in the middle of the rack. Make sure you bake one cookie sheet at a time. Bake for 14 minutes, rotating the sheet halfway through. Transfer the sheet to a rack to cool completely and then repeat with the other batch of macarons.

Now you have to make the filling.

Place the chopped chocolate in a large bowl.

Warm the cream in a small saucepan over medium heat until it just starts to boil. Next, stir it into the chocolate and mix thoroughly. Let the mixture sit for 1 minute. Add the butter and stir until smooth. Chill in the refrigerator until thickened (but still spreadable) for 30 minutes.

Time for assembling!

Scoop about a teaspoon of ganache onto the center of a macaron half. Top with another half and press gently to squeeze together.

You’re suppose to refrigerate for at least 24 hours before serving, but you don’t have to listen to that. We ate them straight away (cue maniacal laughter). 

Happy baking everyone!

yourstrulyg

Posted in Food | Tagged , , , , , , , , | 1 Comment

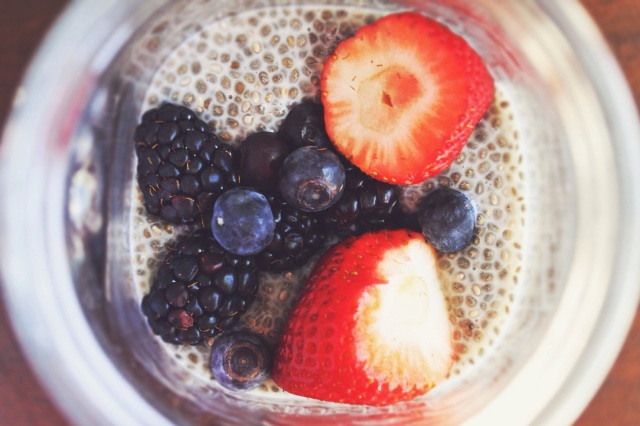
Super Easy Chia Seed Pudding

After a month, I am back. I know it’s been a while, but I have a great recipe to make it up to you: a SUPER easy chia seed pudding.

I’m obsessed with cooking shows. I can’t deny it. I especially love waking up every morning and watching the newest YouTube videos from my favourite channels. Here are a few if you want to check them out: Sorted Food, Bondi Harvest, Tastemade and FoodTube. Watching these shows first thing in the morning is a great way to motivate myself. If I get up and go for a run, I can make one of their recipes for breakfast! Everyone has been using chia seeds lately, so I thought it was my turn to try ’em out. Turns out I love them. Who woulda thought?

Pudding 2

What are chia seeds any way? They are an easy way to kick up nutrition in a dish and they have a lot of energy boosting abilities. They are rich in protein, vitamins, minerals, and omega fatty acids. This is the neat thing: chia seeds absorb liquid, creating a thick gel. They can hold 9-12 times their weight in water! This is why they make a PERFECT pudding.

These edible seeds are also used to make Chia Pets. So after finish making your pudding, why not make your own Chia Pet? There are tutorials all over Google 😉

Recipe makes a single serving

You’ll need:

  • 2 tablespoons chia seeds
  • 1/2 cup coconut, almond or 1% milk
  • 1/8 teaspoon vanilla extract
  • 1 tablespoon maple syrup

Pudding 1

Mix all ingredients in a small bowl or jar. Refrigerate and for an hour, then give a good stir. You want to make sure the chia seeds don’t clump together. Put back in the fridge and leave over night (or at least a few hours).

Easy peasy! A new recipe with chia seeds will be up next Sunday, so keep an eye out.

yourstrulyg

Posted in Food | Tagged , , , , , , , , , , , , | 2 Comments

Valentine’s Day Cards

I think Valentine’s might just be my favourite holiday (excluding Christmas, of course). Some may call it a cliché or “Hallmark holiday”, but I like to think of it as the opposite. Even though I tell the important people in my life that I love them everyday, it’s nice to have a holiday dedicated to expressing that. Plus, it’s a great excuse to give and eat LOTS of chocolate and home baked goodies!

Remember in elementary school when you would spend an afternoon decorating a paper bag that would become filled with valentines the next day? I wish my university did that! It was so nice to dump out that paper bag at the end of the day to discover all the heart warming notes. I remember the handmade cards being my favourites!

So, that brings me to why I’ve made this post. For the past few years, I’ve loved to spend some quality time making Valentine’s cards. This year, I’ve been obsessed with my watercolour pencils. I actually love them. I never put them down. Everyone at home who has gotten snail mail from me has received at least one watercolour card.

Here are some valentines I’ve made for you to use! Send them to whoever you’d like!

Card2Now this has to be my favourite one. I think I have an obsession with Grumpy Cat. My bulletin board in my room has three pictures of him…I’m not crazy am I?

Card1I posted this one on Instagram a couple days ago and everyone LOVED it! Here’s a link to my Instagram account (www.instagram.com/gwynethmc)

Card4

Card3

I hope you enjoy these valentines! Make sure to send them to all those special people on Friday!

I hope you have a lovely day 🙂

yourstrulyg

Posted in DIY | Tagged , , , , , , , , , , , , , , , , , , , , | 2 Comments

Pumpkin Chocolate Chip Cookies

This post is long overdue! I made these cookies…hmm…around Thanksgiving, I think. I had some leftover pumpkin puree and for some reason felt I HAD to use it up or the world would end. Dramatic, I know, but I am very happy I made them.

IMG_3577

I’d say they’re kind of like a cake and a cookie combined. My batch ended up soft on the inside and just a bit crunchy on the outside. This is my roommate Allison’s grandmother’s recipe, and I am so happy she has let me share it with you. Allison returned back to school from a visit home earlier this semester, and brought along a nice big bag of these cookies. She said “pumpkin” followed by “chocolate chip” and I was sold. Seriously though – who can give up some nice homemade cookies?

I am embarrassed to say that I haven’t tried the Starbucks pumpkin spice latte yet. I can feel the waves of judgment now. I realized this as I was baking the cookies. It is very unlike me. I’m that girl who will sit in a Starbucks drinking a vanilla latte or chocolate mocha or frappuccino of some kind while blogging on her Macbook! Therefore, I cannot fathom the fact I have not yet tried a pumpkin spice. I guess I have an excuse for that though: there isn’t a Starbucks super close to my campus. Oh well! When I get home for winter break I shall make sure to stop and grab a pumpkin spice latte at Starbucks. Is it all really worth the hype? I’ll have to find out.

IMG_3565

IMG_3580

You’ll need:

  • 1/2 cup butter
  • 1/2 cup cugar
  • 1 egg
  • 1 cup pumpkin purree
  • 1 tsp vanilla
  • 2 1/2 cups flour
  • 1 tsp baking powder
  • 1 cup baking soda
  • 1/2 tsp salt
  • 1 1/2 tsp nutmeg
  • 1 1/2 tsp cinnamon
  • 1 cup chocolate chips

Cream butter and sugar. Beat in egg.

Add pumpkin and vanilla and mix. Add the rest of the ingredients and mix well!

Bake at 350° for 15 minutes until brown.

These taste best straight out of the oven so make sure you have a cup of tea on hand to go with them! This will definitely be the first recipe I’m going to make my friends and family when I get home. Great for a an escape from the snow along with some hot cocoa.

Yummy yummy in my tummy!

yourstrulyg

Posted in Food | 1 Comment

DIY Heating Pad

December is the month of DIYs (for me at least!). Here’s another great crafting project for these last few weeks before Christmas. These heating pads are the nicest thing to snuggle up with on a chilly night, and now that it’s winter, who could resist?

I hope you enjoy these illustrations! Please let me know. I have an insane amount of fun doing them 🙂

Don’t forget to Tweet, Pin and share this post on Facebook if you think anyone else would enjoy it. I love getting feedback and hearing that you’ve tried my DIYs.

1

Use a long sleeve shirt!

You’ll need:

  • A cotton long sleeve shirt
  • Sewing machine (optional)
  • Needle and matching thread
  • Uncooked rice
  1. Cut off a sleeve of your shirt at the shoulder seam, and turn inside out.
  2. Sew the two openings together on each end, leaving a small opening at one end (minimum 2 inches). If doing this by hand, I would suggest sewing with a small stitch length, or enforcing the stitch by sewing the edges together a few times. You don’t want any rice falling out!
  3.  Turn the tube inside out, using the small opening. Now all the seams are invisible!
  4. Fill the tube with rice. Don’t fill it too full – you want the heating pad to have some flexibility.
  5. Sew the opening using a whip stitch.

2Use a t-shirt or tank top!

You’ll need:

  • A cotton t-shirt or tank top
  • Sewing machine (optional)
  • Needle and matching thread
  • Uncooked rice
  1. Cut a rectangle using one of the side folds of the shirt.
  2. Keeping the shirt folded, sew the open edges together, leaving a small opening at the end (minimum 2 inches). If doing this by hand, I would suggest sewing with a small stitch length, or enforcing the stitch by sewing the edges together a few times. You don’t want any rice falling out!
  3.  Turn the tube inside out, using the small opening. Now all the seams are invisible!
  4. Fill the tube with rice. Don’t fill it too full – you want the heating pad to have some flexibility.
  5. Sew the opening using a whip stitch.

3Use fabric!

You’ll need:

  • Cotton fabric
  • Sewing machine (optional)
  • Needle and matching thread
  • Uncooked rice
  1. Cut out two match shapes (ex. hearts)
  2. Sew both hearts together, leaving a small opening at the end (minimum 2 inches). If doing this by hand, I would suggest sewing with a small stitch length, or enforcing the stitch by sewing the edges together a few times. You don’t want any rice falling out!
  3. Turn the tube inside out, using the small opening. Now all the seams are invisible!
  4. Fill the heart with rice. Don’t fill it too full – you want the heating pad to have some flexibility.
  5. Sew the opening using a whip stitch.

So…I apologize for not having a photo posted of the actual heating pad yet. Whoopsies! I sat down with my shirt, needle and thread the other night and planned to make one while watching Freaks and Geeks, but sadly, I fell asleep and it didn’t get finished (hehe). Now I’ve become swamped with homework! I’ll post a photo as soon as possible I promise! 🙂

Lots of love!

yourstrulyg

Posted in DIY | Tagged , , , , , , , , , , , , | 3 Comments

Crocheted Ear Warmers

It’s that time of year! The time where all of us DIYers get on Pinterest and Craftgawker, and search for holiday gift ideas. I know not everyone crochets, but it is surprisingly very easy! I only started 3 weeks ago. If you’re looking for other present ideas, many more DIY projects will be posted over the next month, so keep checking back!

Gwyneth1

I had always been incredibly scared of crocheting and knitting, but I knew one day I’d have to try it out, being a DIY blogger and all. After getting to know a bunch of new people here at university, I discovered that my friend Carissa was a crocheter! I mentioned to her that I wanted to learn, and was instantly given yarn and a crochet hook! Next thing I knew, I’d finished a cup cozy and now, a few ear warmer headbands.

I honestly don’t need these here in sunny Arizona at the moment, but I know that everyone loves them at home. So, I decided that these crocheted ear warmers would be the perfect Christmas gift for all my friends.

Gwyneth2My amazing aspiring photographer friend Ceara took these photos. She did a wonderful job! Thanks again Ceara – I definitely owe you some freshly baked double chocolate chip cookies for helping me out with this one 😉

Now let’s get crocheting!

You’ll need:

  • Yarn
  • Crochet hook (I used a 5mm)
  • Needle
  • Matching thread

Abbreviations:

  • ch = chain
  • dc = double crochet

Measure your head. Chain a little bit less than this length (you want the headband to be snug and elastic on your head).

Row 1: Dc in the fourth chain from hook and in each chain across.

Row 2: Ch 2. Turn. Dc in fourth chain from hook and in each chain across.

Row 3-7: Repeat row 2.

Fold the headband and sew the edges together.

For the optional knot:

Chain 15.

Row 1: Dc in the fourth chain from hook and in each chain across.

Row 2: Ch 2. Turn. Dc in third chain from hook.

Row 3-5: Ch 2. Turn. Dc in fourth chain from hook and in each chain across.

Finish off , wrap around your headband and sew the edges together (I positioned this knot by the seam of the headband to hide it).

So there you go! Good luck. I swear, it’s not as hard as it seems. There are some great YouTube videos out there that can teach you the basics, so I would definitely check those out.

yourstrulyg

Posted in DIY | Tagged , , , , , , , , , | 5 Comments

Pumpkin Pull-Apart Bread

“…It was super fun to pull it apart and stuff! I really liked that part!” – Carissa

You heard it. Carissa never lies. This recipe takes a pretty long time, but it is worth it! I thought I’d post this now so when Thanksgiving rolls around here in the US, and you have some left over pumpkin puree from that pie, you could make this delicious bread.

Being the adorable college students we are, five of us sat down after a long day of work to drink tea and eat pumpkin pull-apart bread. I was pretty darn happy 🙂 I have noticed that since I’ve started university, food is my go to stress reliever. Baking in the kitchen reminds me of being at home!

IMG_3540

Bread 1

Thank you so much to Sunny Side Up for this recipe!

You’ll need:

For the bread

  • 2 Tbsp unsalted butter
  • 1/2 cup milk
  • 2 1/4 teaspoons (1 envelope) active dry yeast
  • 3/4 cup pumpkin puree
  • 1/4 cup white sugar
  • 1 tsp salt
  • 2 1/2 cups bread flour
  • 1 cup granulated sugar
  • 2 tsp ground cinnamon
  • 1/2 tsp fresh ground nutmeg
  • 2 Tbsp unsalted butter

In a saucepan over medium-high heat, brown 2 tablespoons of butter, letting it bubble up and turn a dark golden brown but being careful not to allow it burn. Once browned, remove the pan from the heat and carefully add the milk, return to stove and heat through. Pour the milk and butter into the bowl of standing mixer fitted with a dough hook (you can also do all of this by hand!) and allow to cool so it is no longer hot but also not cool (about 100-110 degrees F). Once it has reached a warm but not hot temperature add the yeast and 1/4 cup of sugar and allow to proof (this can take up to 8 minutes, the top will look foamy and the liquid cloudy). Then add the the pumpkin, salt, and 1 cup of flour. Stir until combined then add the rest of the flour 1/2 cup at a time and knead for 6 minutes, until the dough is smooth and elastic and just slightly sticky. If the dough is too moist, add extra flour 1 tablespoon at a time.

Move dough to a lightly oiled bowl and cover with a clean towel. Allow to rise in a warm place for 60-90 minutes or until doubled in size.

While dough is rising, brown another 2 tablespoons of butter. Set aside. In a separate bowl, mix the sugar, cinnamon, and nutmeg and mix well.  Set aside. Next, grease and flour a 9×5 loaf pan and set aside.

When the dough has doubled in size, punch it down and flip out onto a clean floured surface and knead with hands for 1-2 minutes. Roll dough into a 20×12 inch rectangle. Brush the dough with the browned butter and then evenly sprinkle with the cinnamon sugar mixture and press into dough with palms of the hand. Cut the rectangle into 6 strips. Lay strips on top of each other and cut each strip into 6 even squares (cut in half then each half into thirds). Stack strips vertically into the loaf pan. Cover the pan with a clean towel and let rise for 30-45 minutes.

In the meantime preheat an oven to 350 degrees. After rising in the pan bake for 30-40 minutes (mine took 37 exactly) or until top is a very deep golden brown.

Now, I order you to take a break. Make this recipe, read a book while the dough rises, and then eat with a cup of warm tea.

yourstrulyg

Posted in Food | Tagged , , , , , , , , , , , | Leave a comment